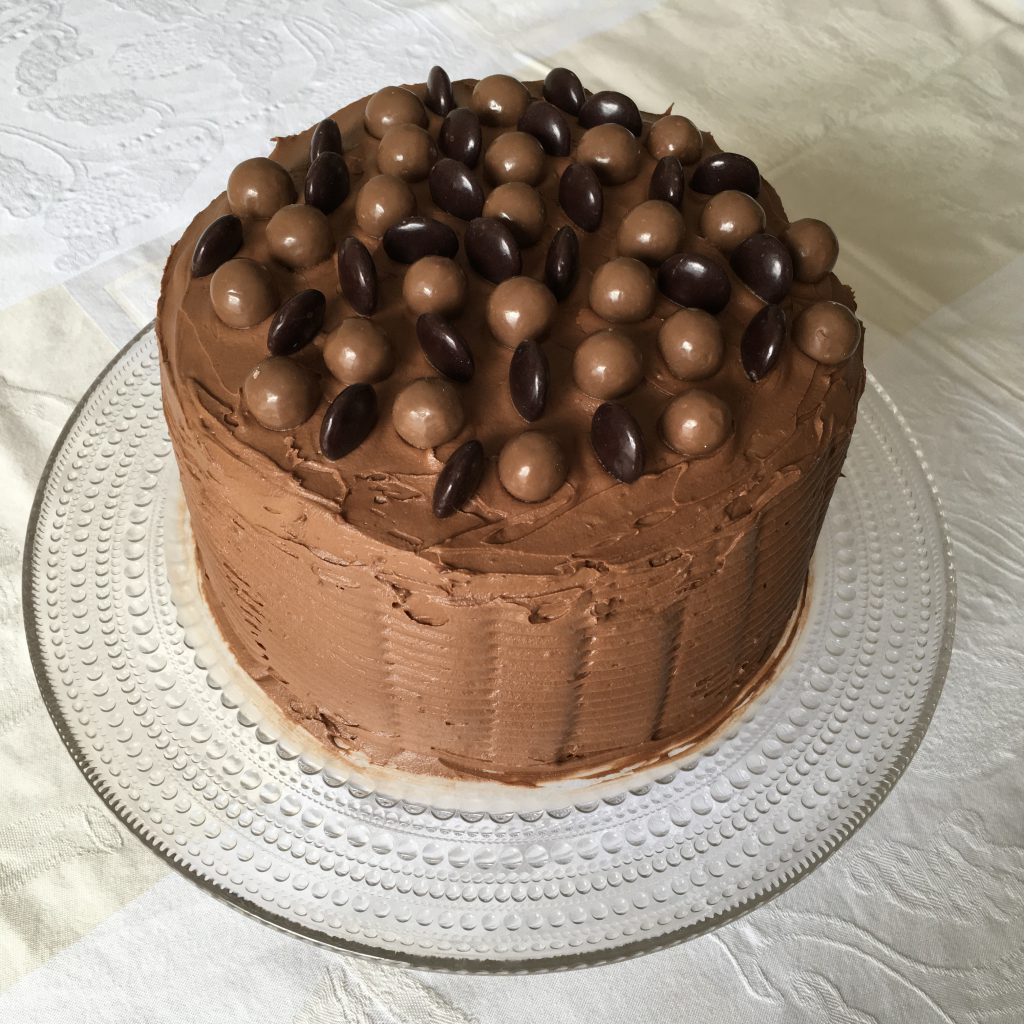
There are three family birthdays in June within a space of eight days so it is Cake Central here in our home. We kick off with Junior 3’s birthday and fortunately he asked for the family favourite Malteser and Minstrels Chocolate Cake. We often make this for family birthdays and the reverence with which the children eat the cake makes my eyes moist.
It is just a cake but a cake that encapsulates childhood for them.
I was therefore a bit troubled when Junior 2 asked for Momofuku’s Milk Bar Birthday Cake for her birthday. The blurb accompanying the recipe says: We took the best parts of childhood, removed all of the awkwardness and added heaps of made-from-scratch birthday cake and frosting (inspired by the boxed supermarket stuff we grew up with).
The thing is, my children did not grow up eating cake made from packet mix or instant frosting. Maybe it is time I challenged myself to make a homemade cake that tastes like an imagined perfect childhood birthday cake.
The original recipe is clear and gives step-by-step instructions. In this recipe I have simplified some steps, reduced the amount of sugar and salt and made more icing. Sourcing some of the ingredients involved running around town but it gave us a reason to venture out as the lockdown eases in London. When I mentioned to Niece Number One about the different items I had to hunt down before starting on the project, her words of encouragement were: Go hard or go home, I always say.
If you only have a bit of spare time each day to make one element of the cake, then in order of how long it can be kept before assembling, make the crumbs first, then the frosting and lastly the cake. The cake soak, which I omitted, can be made at the very last minute. The assembled cake must be frozen for at least 12 hours, which makes it an ideal cake to be made ahead of the birthday itself.
STEP 0: EQUIPMENT
Three 7-inch/ 18cm sandwich cake tins
One flat baking sheet that can fit into a freezer shelf
One 6-inch/ 15 cm diameter cake ring for assembling the cake (the height of this is 3 inches/ 8 cm)
One strip of acetate 6 x 20 inches/ 14 x 51 cm, to form a cake collar when assembling the cake
I used a KitchenAid but the cake can be made using an electric hand-held beater.
STEP 1: BIRTHDAY CAKE CRUMB
75 g unrefined granulated sugar
25 g soft light brown sugar
90 g cake/ all-purpose flour
20 g rainbow sprinkles
½ teaspoon baking powder
½ teaspoon fine sea salt
40 g grapeseed or sunflower oil
1 tablespoon clear vanilla extract
Heat the oven to 300°F / 150°C.
Line a baking tray with greaseproof paper.
Place the sugars, flour, sprinkles, baking powder and salt in the bowl of a stand mixer (e.g. KitchenAid) fitted with the paddle attachment. Mix on low speed until well combined.
Add the oil and vanilla and mix until the ingredients form small clusters.
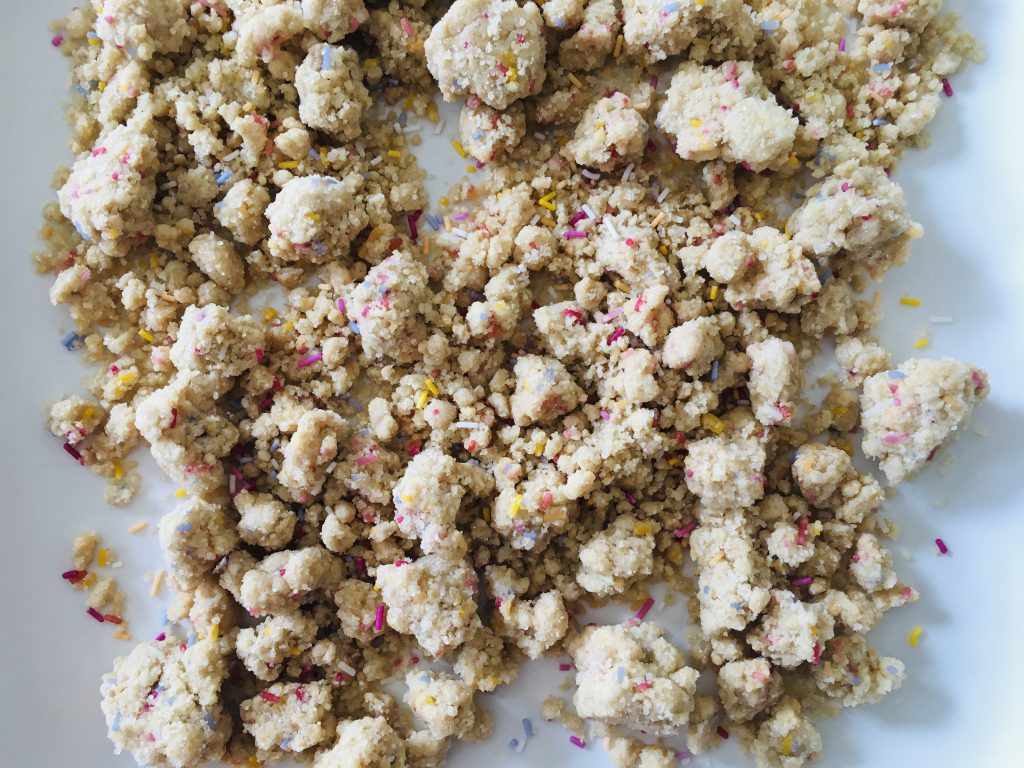
Bake the crumbs for 15 minutes. Cool the crumbs completely before storing in an airtight container until you are ready to assemble the cake. This will keep for one week at room temperature or for one month in the fridge or freezer. It actually tastes delicious and you must put it away before you pick at it each time you pass the bowl.
I now know why this cake is described as a memory of childhood. For a brief moment, as I removed the crumbs from the oven, the kitchen smelled of Famous Amos cookies

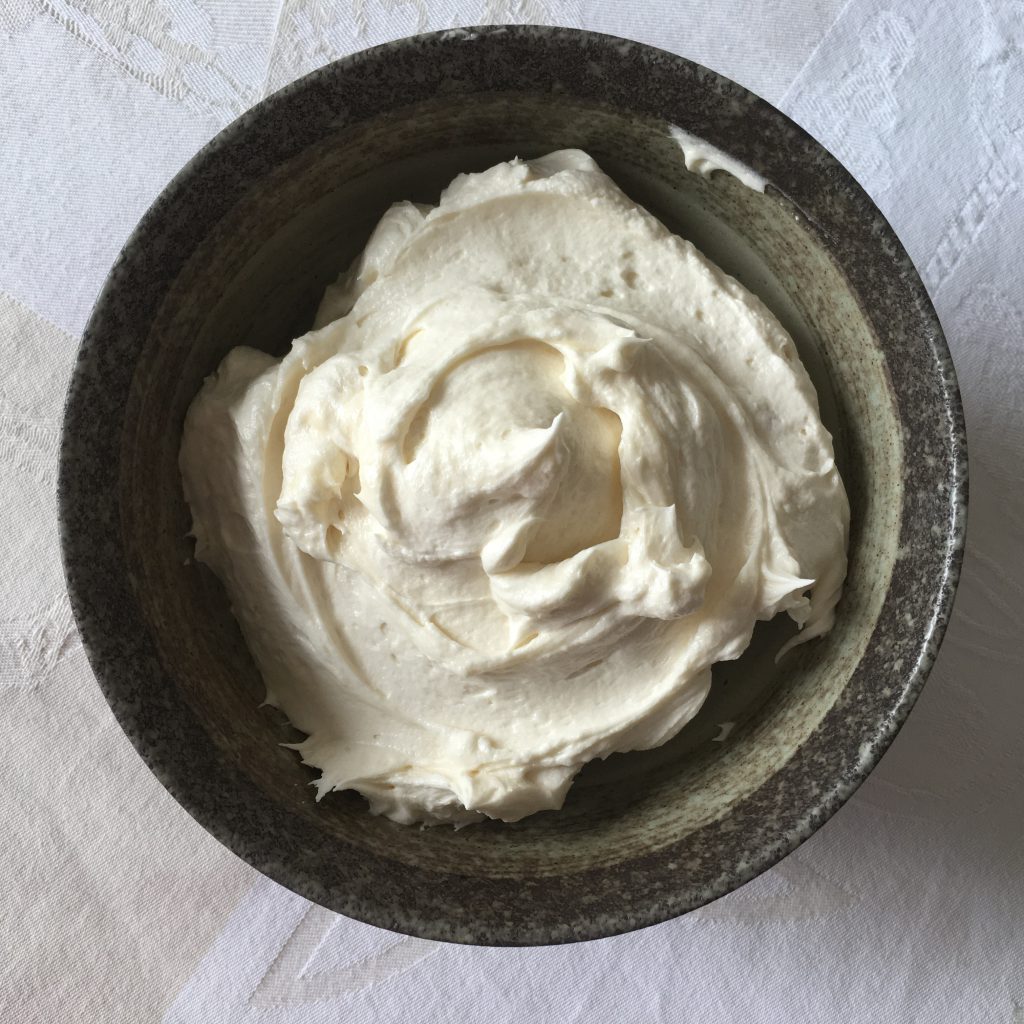
STEP 2: BIRTHDAY CAKE FROSTING
175 g butter, softened
75 g vegetable shortening e.g. Trex
85 g cream cheese
1½ tablespoons liquid glucose
1½ tablespoons corn syrup
1½ tablespoons clear vanilla extract
250 g icing sugar
¼ teaspoon fine sea salt
Place the butter, shortening and cream cheese in the bowl of a stand mixer fitted with the paddle attachment. Cream together on medium-high speed for 2 to 3 minutes, until the mixture is smooth and fluffy. Scrape down the sides of the bowl.
Add the glucose, corn syrup and vanilla then beat on medium-high speed for 2 to 3 minutes, until the mixture is silky smooth and glossy white. Scrape down the sides of the bowl.
Sift in the icing sugar and salt, and mix on low speed initially so the icing sugar does not fly about. Raise the speed back to medium-high and beat for 2 to 3 minutes, until the frosting is a bright white and very smooth.
Store the frosting in an airtight container until you are ready to assemble the cake. This will keep for up to one week in the fridge.
The icing is the anchor between the layers of cake and also its crown, so I made 50% more
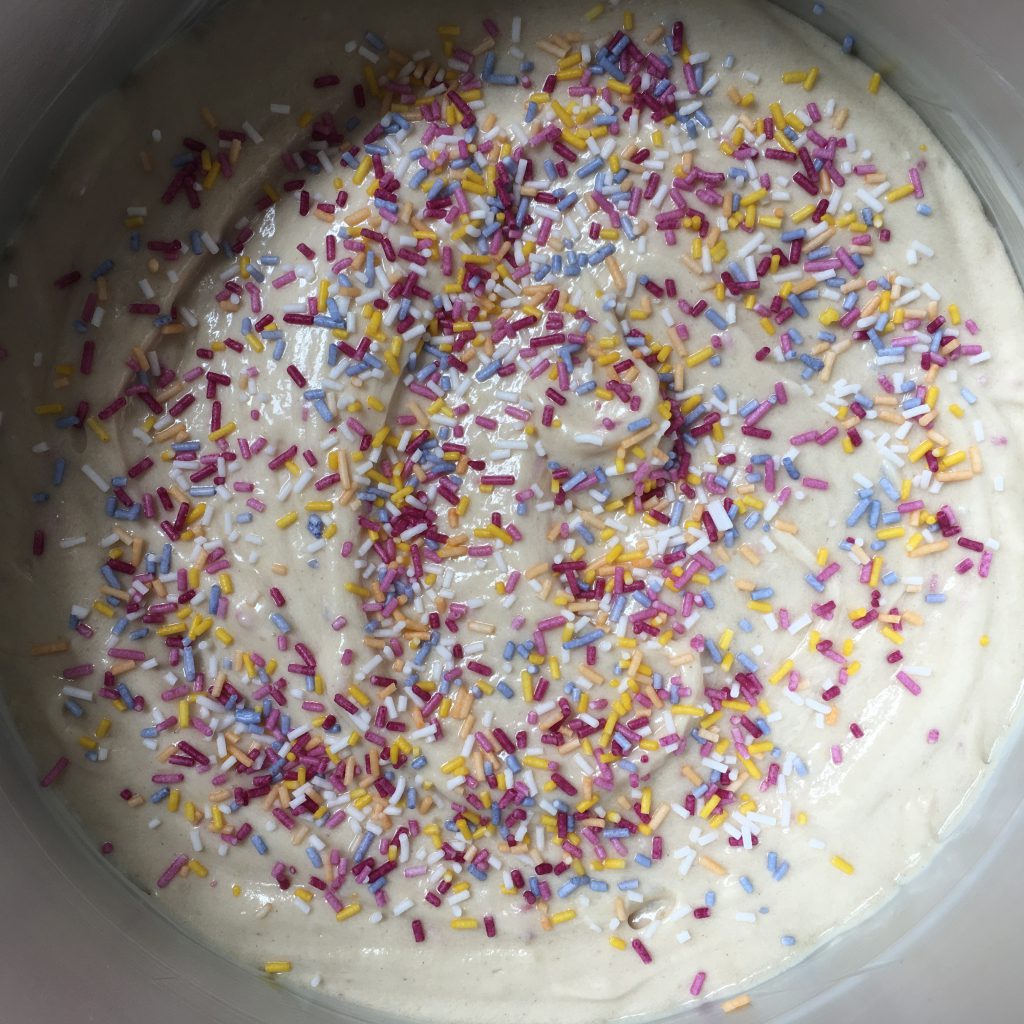
STEP 3: BIRTHDAY CAKE
75 g butter, softened
80 g vegetable shortening e.g. Trex
200 g granulated sugar
25 g light brown soft sugar
4 large eggs
150 g buttermilk
85 g grapeseed or sunflower oil
1 tablespoon clear vanilla extract
325 g cake / all-purpose flour
2 teaspoons baking powder
½ teaspoon fine sea salt
70 g rainbow sprinkles
Plus another 30 g rainbow sprinkles for the top of the cake
Heat the oven to 325°F / 170°C .
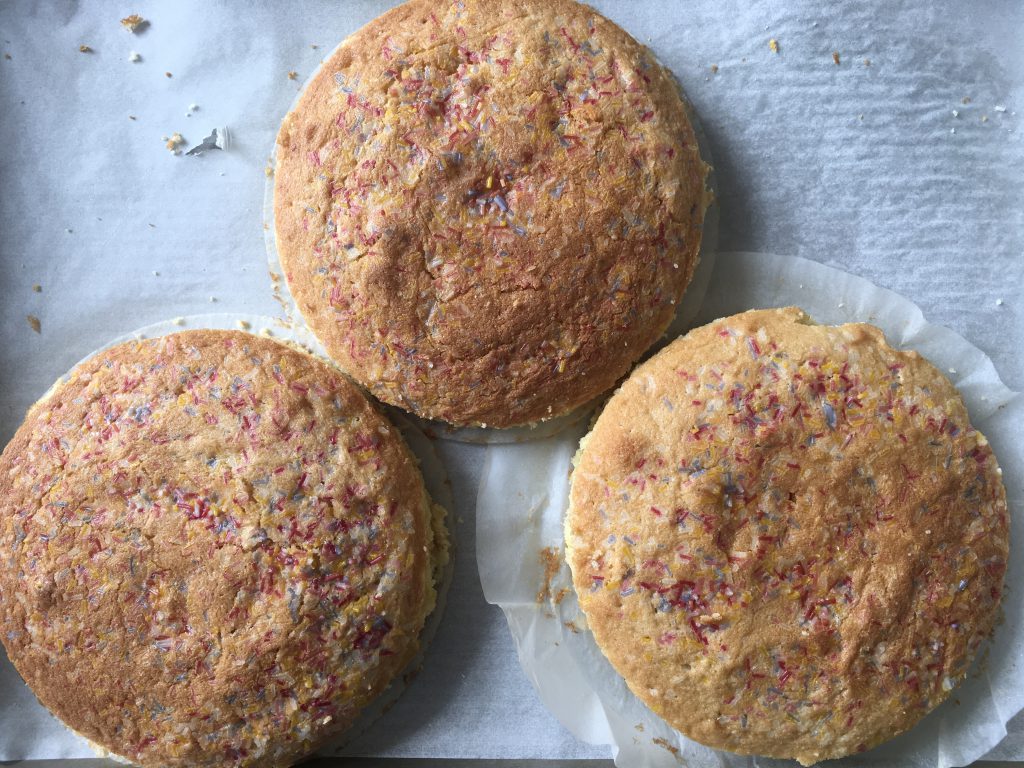
Grease and line three 7-inch sandwich cake tins, from which you will cut out three 6-inch cakes.
Place the butter, shortening and sugars in the bowl of a stand mixer fitted with the paddle attachment. Cream together on medium-high speed for 2 to 3 minutes. Scrape down the sides of the bowl.
Add the eggs and mix on medium-high speed for 2 to 3 minutes. Scrape down the sides of the bowl.
On low speed, stream in the buttermilk, oil, and vanilla. Increase the mixer speed to medium-high and beat for 4 to 6 minutes, until the mixture is very white and has increased twice in volume. Stop when the mixture is homogeneous and there are no streaks of fat or liquid. Scrape down the sides of the bowl.
Sift in the flour, baking powder and salt, then add 70 g sprinkles. Mix on low speed initially so the icing sugar does not fly about, then continue to mix on medium speed for about a minute until the batter comes together. Scrape down the sides of the bowl.
Using a spatula, divide the cake mixture between the three sandwich tins. Sprinkle the remaining 30 g sprinkles evenly on top of each cake.
Bake the cakes for 30 minutes or until it bounces back when pressed. A metal skewer inserted in the centre should come out clean.
Leave the cakes to cool slightly in the tin before turning out onto a wire rack to finish cooling.
Using a 6-inch/ 15 cm cake ring, cut out three cakes from each of the 7-inch cakes. Wrap and store the cakes until you are ready to assemble the birthday cake. This will keep in the fridge for up to 4 days.
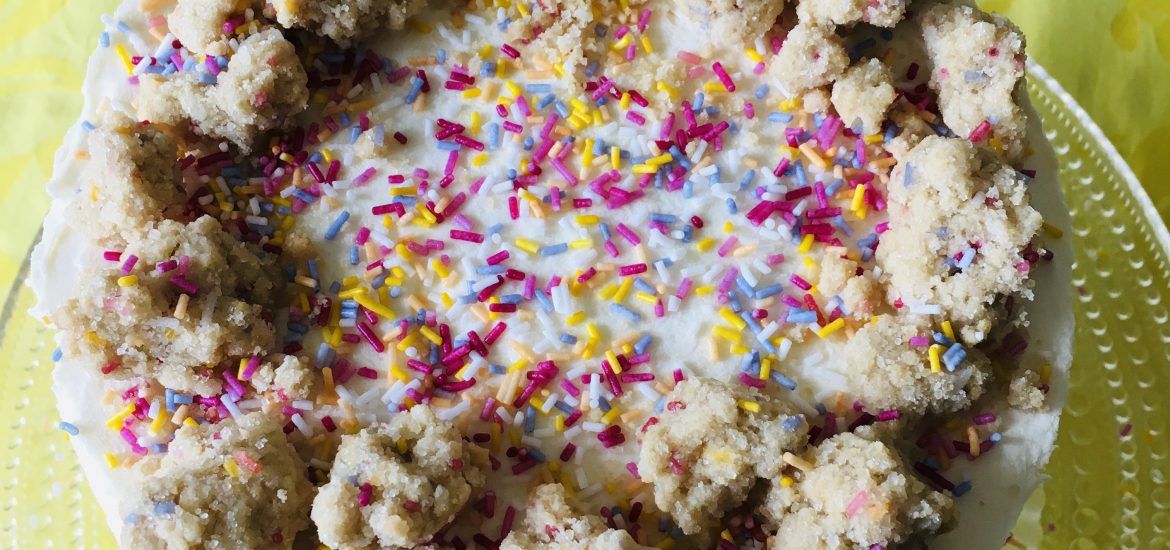
The only sprinkles I could find were too light in colour, and also too small, to achieve the bright flecks of colour that should run through the cake
![]()
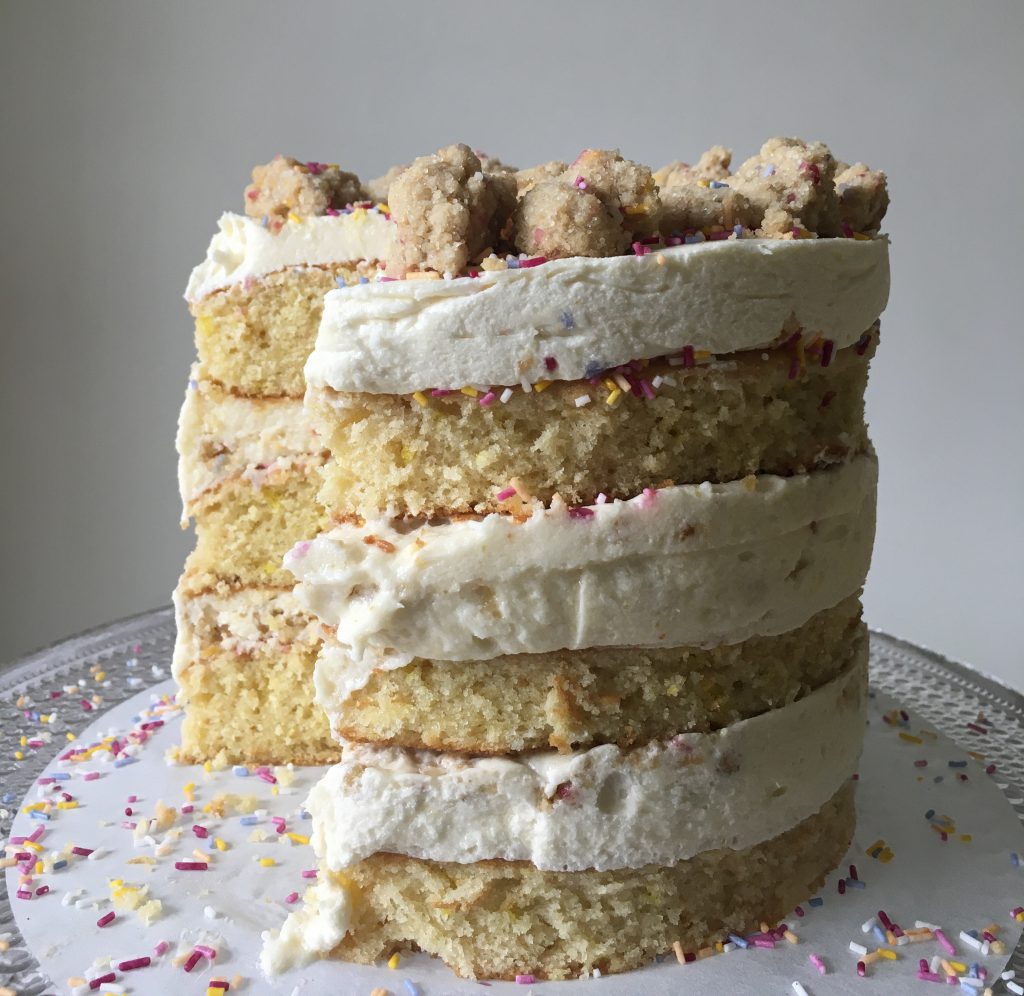
STEP 4: ASSEMBLING THE CAKE
Part 1
Place a 9-inch / 23 cm round piece of baking parchment on a baking sheet which will fit into a freezer shelf. You will be transferring the entire cake into the freezer later.
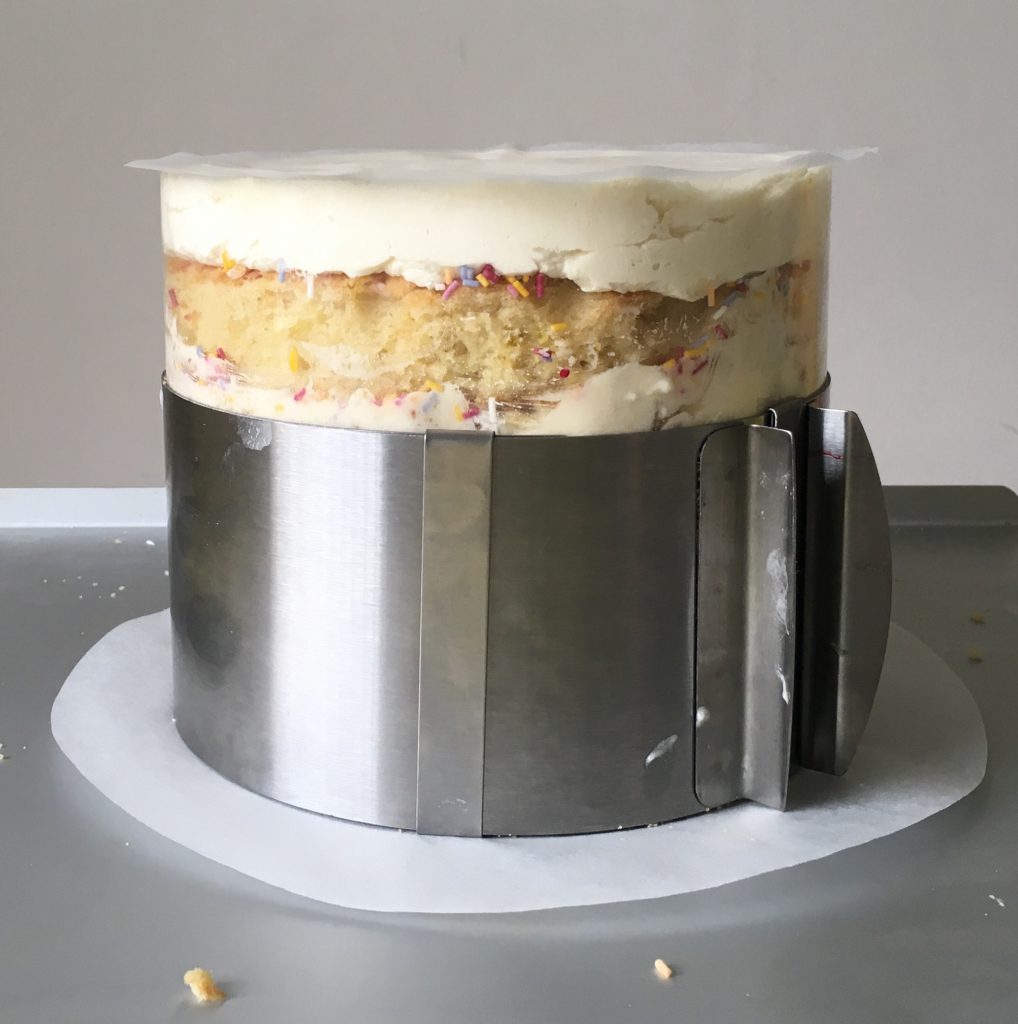
Place the 6-inch / 15 cm cake ring on to the centre of the tray, on the baking parchment. Line the inside of the ring with the strip of acetate. This is in order to support the height of the finished cake.
Place one cake inside the ring, pressing it down until it reaches the base of the ring. Using a large metal spoon, spread one-sixth of the frosting in an even layer over the cake.
Sprinkle one-third of the birthday crumbs evenly over the frosting. Using the spoon, spread another one-sixth of the frosting over the crumbs.
Part 2
Place the second cake on top of the frosting, pressing it down gently. Using a large metal spoon, spread one-sixth of the frosting in an even layer over the cake.
Sprinkle one-third of the birthday crumbs evenly over the frosting. Using the spoon, spread another one-sixth of the frosting over the crumbs.
Part 3
Place the third cake on top of the frosting, pressing it down gently. Cover the top of the cake with the remaining frosting: you can opt for a flat top or swirl the frosting round.
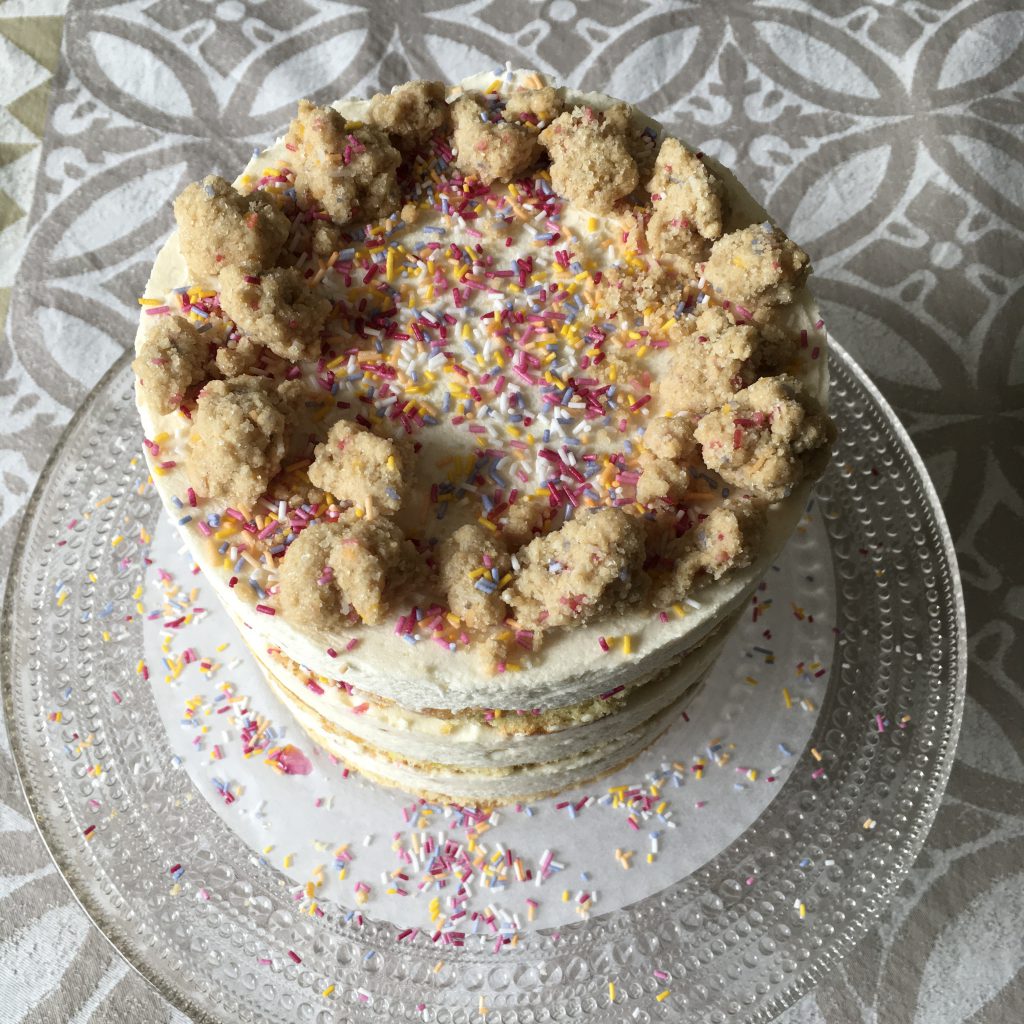
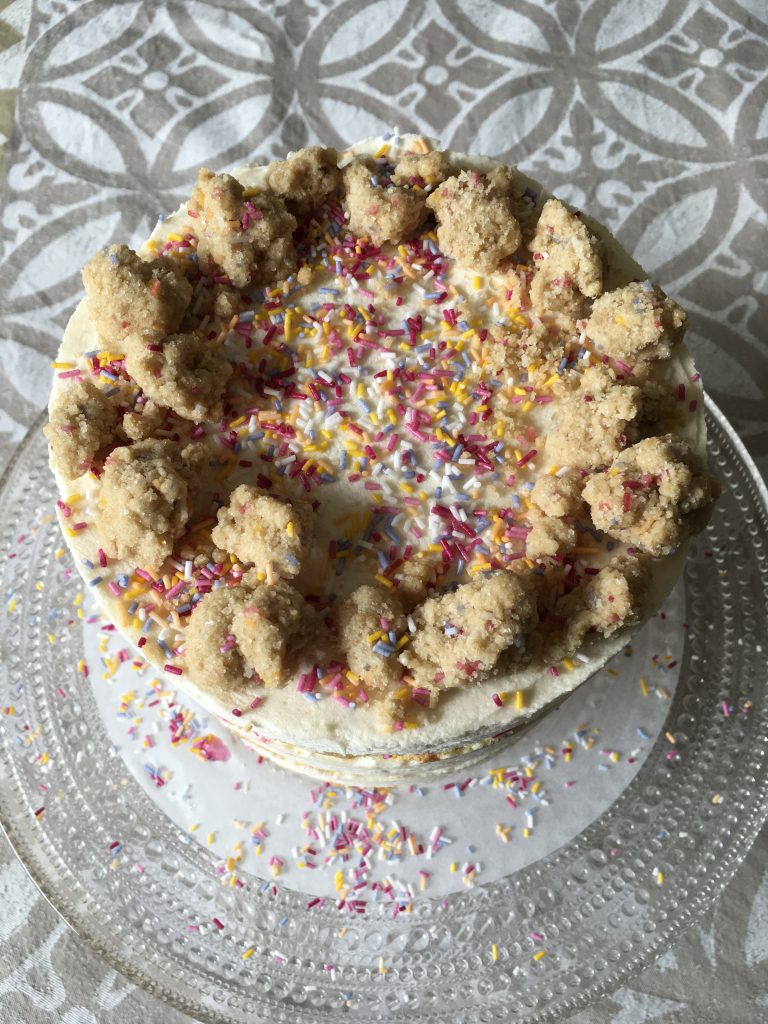
Garnish the frosting with the remaining birthday crumbs (or you can do this last step after you have removed the cake from the freezer and just before serving).
Transfer the baking sheet to the freezer and freeze for a minimum of 12 hours to set. The cake will keep in the freezer for up to 2 weeks.
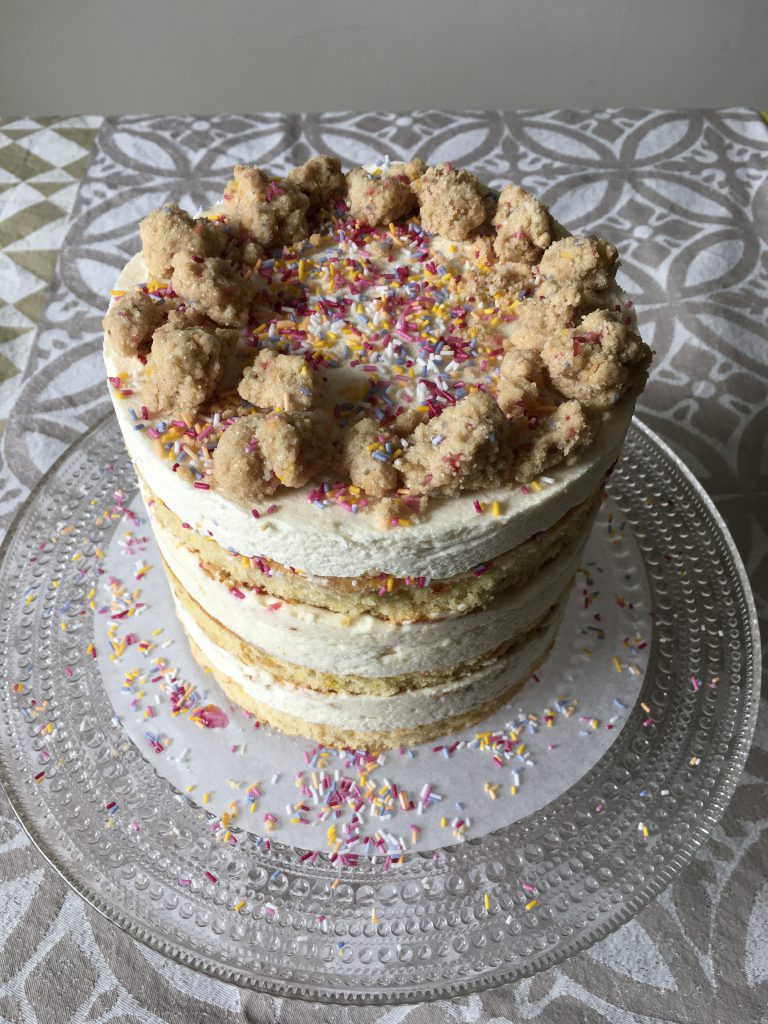
The cake is assembled and held together inside a cake ring, supported by an acetate cake collar
STEP 5: SERVING THE CAKE
At least 3 hours before you want to serve the cake, remove the baking sheet from the freezer. Slowly slide the baking parchment and cake onto a serving plate.
Allow the cake to defrost in the fridge for a minimum of 3 hours.
Just before serving, remove the cake ring by sliding it off towards the top. Gently peel off the acetate.
(If you are like me) Heave a sigh of relief. Sing Happy Birthday, blow out the candles, slice the cake into wedges and serve.
Store the uneaten portion of the cake back in the fridge as the icing softens quite quickly.
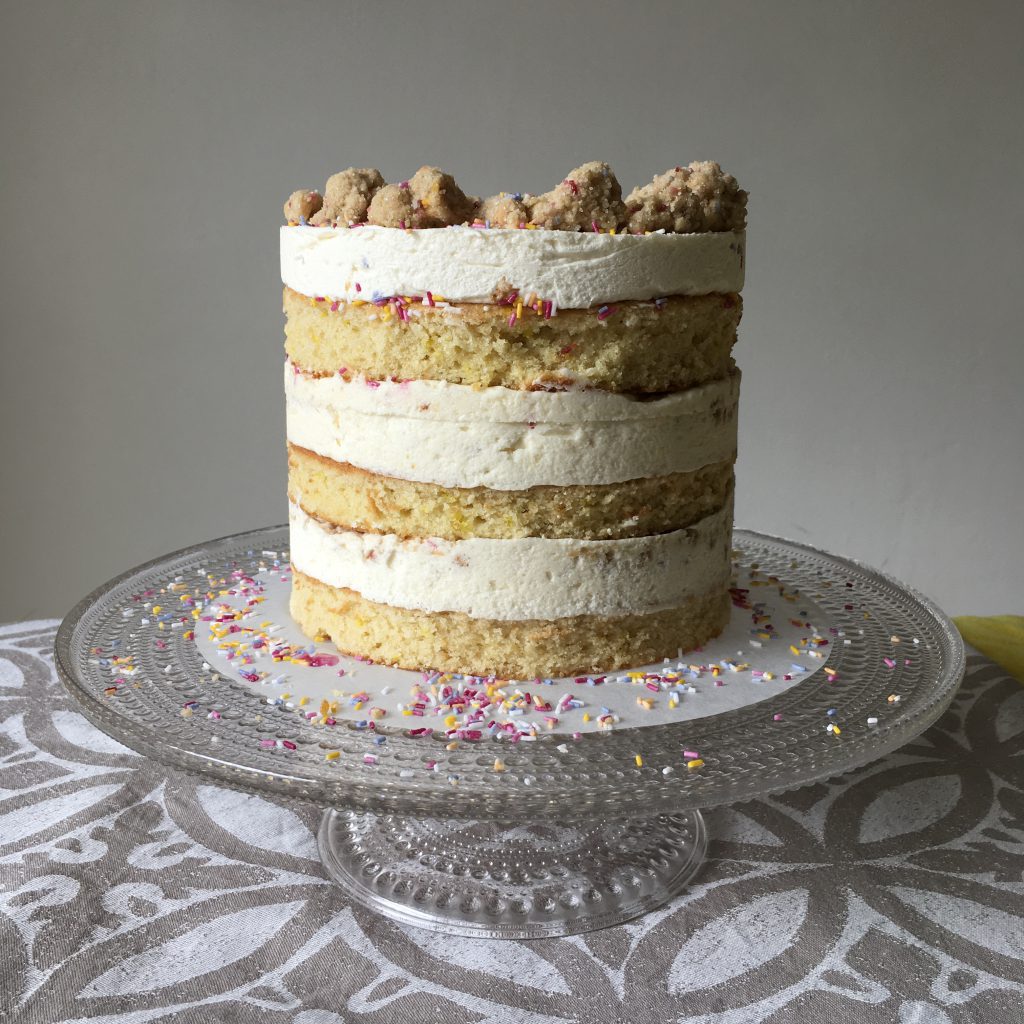
The cake unmoulded and presented on a cake stand
Here are my observations and unanswered questions:
I don’t know why the cake needs to be frozen and what would happen if you did not freeze it beforehand. And if you did freeze it, but not for a minimum of 12 hours, would it make a difference? I guess that if freezer space is at a premium, your best option is to make the cake as near to the day you need it and then chill in the coldest part of your fridge for a day at least.
I am not sure why we sprinkle the top of the cake with more sprinkles before baking, because the cake is hidden under a mound of icing anyway. It would be better to just add the extra sprinkles (30 g) into the cake mixture. The sprinkles I found in the supermarkets were quite weak in colour but were probably more ‘healthy’. To be successful you really need to get sprinkles that have a dose of artificial colouring. I found an American website dedicated to sprinkles which I thought was wonderful. In London I have used Sugarshack for cake decorating ingredients.
It was impossible to find clear vanilla extract (a flavouring) as even the most basic shops now sell natural vanilla extract which is brown in colour. The brands to look for are McCormick and Wilton, both American. The crumbs, cake and frosting therefore used natural vanilla. At least 20% of the childhood factor might have been lost because of this.
I used unrefined sugar for the cake and crumble, so these parts would not be as pale in colour as expected. I did use white icing sugar because I felt that at least one element of the cake had to be brighter.
The original recipe calls for the cake to be baked on one sheet pan (with a specific dimension) and then cut out into two circles with the third cake reformed from the leftover bits. I thought it was much simpler to make three round sandwich cakes. The reason for cutting out the cakes and removing the edge is to expose the sides. I believe such cakes are called naked cakes. As ever, nudity sells.
The original recipe calls for a pinch of baking powder and a pinch of citric acid to be added to the frosting. The only reason I can think of for adding this is to brighten the icing further. Since I had already compromised the look of the cake and crumble by using unrefined sugar and unbleached cake flour, I did not think that omitting these two ingredients would make an overall difference.
By the time I had made the crumble, frosting and cakes, I completely forgot about the Cake Soak which is 55 g milk and 1 teaspoon vanilla extract combined. Spread this over the bottom two cake layers. Why not the third and topmost layer? I don’t know.
This was one of the most labour intensive cakes I have ever made. In the US you can buy the cake online. Had this been possible in London I would have been tempted, but then I would not have had so much fun. I learnt how to assemble a cake using a flexible cake ring and acetate, and have now thought further to making other similar cakes, like a Brooklyn Blackout Cake I saw in my Desserts of New York book.
I read the recipe through around ten times before I ventured into the kitchen. The children would have been smarter and would have watched the video first. The thing is, I am getting older and not being at school, would still like to keep my brain working as much as possible. It is still a good thing to read recipes, figure out the steps and manage as best as you can without having your hand held too much.
The cake was totally delicious. Junior 3 asked if I added the soak and I truthfully said I had not. Should I have done so, I asked. He said yes, but I am not totally convinced. Maybe next time.
Finally, just a note that my favourite glass cake stands are from the Finnish company Iittala. I like them because it somehow reminds me of growing up in a simpler yet more elegant time, when my mum would put on lipstick and wear high heels and look glamorous without photoshop or instagram filters. I don’t touch up my food photos but at least I can make sure they are presented on lovely plates.
Bon Appétit and Happy Baking!